

Or so the calendar says. By the looks of the gray skies and melting snow banks outside my window, it doesn’t really look or feel like it. At our house we have been doing spring crafts in hopes we will coax spring out of hiding. Clearly it is not working, but maybe with help from all of you, we can will the flowers to bloom with Spring crafts for kids.
Milk Marbling
This is a fun craft that is both creative and a science experiment. I would like to take credit for this idea but I can’t–a friend shared this with me on Facebook.
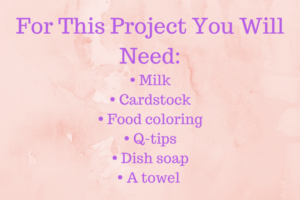
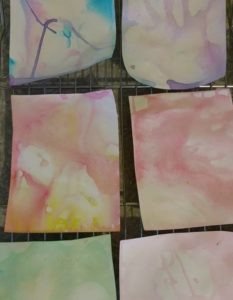
So here were go, the fun part! Pour a little milk in a pan that will fit a piece of paper. Add a few drops of food coloring, we stuck to one or two colors. Dip a Q-tip in dish soap, touch the food dye with it and watch the magic happen. The soap, milk and dye have a reaction that is quite awesome to watch. The next step is to dip the paper in the milk. Hold it up to let the milk drip off, then let dry. The color will stick to the paper to create a beautiful effect. I suggest letting the paper dry on a baking rack to avoid it sticking to a table. Once dried you can do anything with these beauties–we are making Easter eggs and spring flowers out of ours.
[hr]
Speaking of flowers, we did a project last year for Mother’s day I like to call planting flowers, which was a big hit with the grandmas.
Planting Flowers
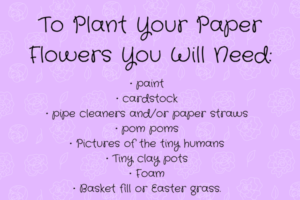
The first step is to have your child create some awesome art work. There are many ways to do this: finger painting, marble painting, splatter painting, or milk marbling, just to name a few. Once dry cut out flower shapes–I used a cookie cutter for one and free-handed the others. Cut flower shapes out of a few pictures of your child. Glue the pipe cleaners or paper straws to the back of the flowers, place a small piece of foam in the tiny pot and start planting your flowers. I added some pom poms to the center of a few flowers and then covered the foam with some green basket fill. We took a few of the extras and tied them into bunches to give to a few other mothers we know.
[hr]
Easter is coming fast. Hopefully we will be able to be outside in the spring sunshine hunting eggs if Mother Nature will cooperate. Another Facebook find for us was tie dying eggs. Super easy, super fun!
Tie Dye Eggs
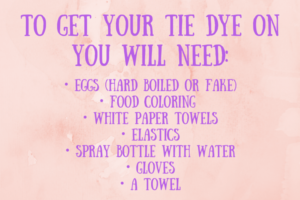
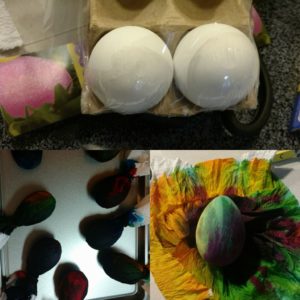
We used fake eggs because my boys are still young, and gentle isn’t our strong suit. First, you wrap each egg in a white paper towel and tie the top off. Next you let your tiny human put a few drops of food dye on the egg–we used three colors per egg. After you add your color, spray each egg with water to make the colors spread. The trick is to make sure you can’t see any white on the towel. Put on a glove and squeeze the egg in your hand. All that is left to do is to let them dry. Once dry, open them up! We let some sit over night and others we opened as soon as we could. I noticed the ones that set over night did have richer coloring. These eggs are fun to look at, fun to find and even more fun to make!
[hr]
Every new season and holiday is a reason to decorate the front door. There are many ways to this. One of my favorite fall backs is a piece of poster board cut into whatever shape fits the season–our doors currently have poster board eggs. Cut the shape out then let your child go to town decorating it. Once the holiday has passed I have big flowers to put back on our doors; this was our first attempt to coax spring out of hiding. They are made from craft paper and aluminum foil, yes your read that right foil.
Giant Flower
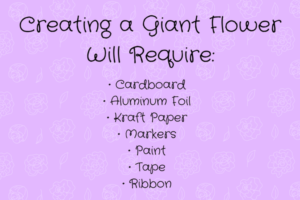
I rolled out a piece of craft paper the length of my kitchen and taped it to the floor. I put paint directly on the paper, gave my boys brushes, loofahs, sponges, knotted up plastic bags, cotton balls in a clothes pin and they also used their fingers. They created a masterpiece that also entertained them for a solid block of time. All the different tools to paint with was my way to teach them about texture. Once that was done, I covered a large circle of cardboard with aluminum foil. My boys used crayons and markers to decorate this part. Again, this was a different texture for them. This circle will be the center of your flower. Once the kraft paper dried I cut out petals, taped them to back of the circle, added some ribbon to make it easier to hang on the door and voila! You have a beautiful flower for your door. I got everything for this project from the Dollar Store.
[hr]
Time to put a spring in your step and get to crafting! Hopefully with our combined efforts we can make spring finally come out and play!


